Tag: hard drive
My Popcorn Hour Drive Died
by Jitesh Gandhi on Oct.09, 2010, under Computer Hardware, Technology
Last year, I added a 1.5 TB Western Digital Green Caviar drive to my Popcorn Hour A-110. Last week, I was going to play something back from the hard disk and it wasn’t listed as a source. I did a hard reboot and the drive was back, but playback was horrible (took forever to play a few seconds and then it would pause). Browsing the drive from my PC also was real slow.
I figured it was dying, but from past experience with Western Digital I had to run the diagnostics and give them the error code. I also had a fair amount of video stored on the drive that I wanted to get off the drive. So I hooked the drive up and rand the diagnostics first.
After that, I had to find a way to mount a Linux (ext3 file system) drive in Windows. I used Ext2 Installable File System For Windows to do it. Unfortunately, the drive wasn’t dismounted properly so I kept getting a message saying:
The disk in drive X: is not formatted. Do you want to format it now?
That’s the last thing I wanted to do since I wanted to get data off the drive. Digging around led me to a utility to check the mounting status of the drive. It was simple enough to run from the command prompt (change directory to the folder containing the executable):
mountdiag X:
It told me the drive was not unmounted properly and there were items in the journal that needed to be completed. Unfortunately the Ext2IFS doesn’t have any mechanisms to mount a drive in this situation. I needed to mount/unmount it in Linux. For this, I turned to SystemRescueCd and created a bootable USB stick. From there, I used my extremely rusty Linux knowledge to mount and unmount the drive.
I was able to mount it in Windows and start copying the files. It took 4 days to copy 204 GB (to give you and idea about how messed up the drive was) and another day to delete 27 files from the drive.
I took a look at the Western Digital support site at the Warranty/RMA information and saw that they had an option to upgrade your drive during the RMA process. I thought I’d take a look at how much a 2 TB drive would cost. After the laughter, the cost was $108 and Newegg had a new 2 TB drive for $100. I thought I’d be willing to pay $20, $25 at most for the extra 500 GB.
So, I called up Western Digital expecting to have to talk to tech support, jump through a couple hoops and get a RMA number, but they have changed how they handle RMAs. Basically, no questions asked. If your drive is in warranty and you want a replacement, you ask for a RMA. Then you have the option of sending your drive first or having them ship first (they take your credit card and put a hold on the funds in case you don’t send your drive back). So I chose to have them send it first since I didn’t need to worry about a weird situation where they get the drive back and determine it wasn’t defective. (Now they take anything back and if the drive is good, it will become a replacement drive and if it’s bad, they toss it.)
To my delight, Western Digital sent me a 2 TB replacement drive. So I ended up getting a free 2 TB upgrade (well, it cost $6 to send the old drive back) which is really nice.
One last note for anyone doing a RMA for their hard drive. The warranty on the replacement drive is initially 90 days. Western Digital transfers the old warranty over after they get the original drive back. So if you check it when you get it, you may be surprised. I will still double check that the warranty gets updated in a month or so to be safe. I still have 2 years left.
October 18 Update: Western Digital got my bad drive back and transferred the remaining warranty to the replacement drive.
Quick Format or Regular Format
by Jitesh Gandhi on Feb.07, 2010, under Computer Hardware, Technology
It has been a while since I had installed a new hard drive. I bought a 2 TB hard drive for media. In Windows I initialized the disk, partitioned and formatted it. Well, as the formatting was taking longer and longer I thought I’d check if that was normal. (It ended up taking 7 hours.)
Some people were recommending a quick format for new drives. That would’ve taken no time at all. I think I got to the bottom of it, and despite taking so long (I would’ve done it overnight to save time had I known), I think the regular format is best.
The quick format basically sets up the disk for use. The thinking of some is that since the disk is new and empty, there’s no need to do a full format (writing to the entire drive).
The regular format checks for bad sectors. This is what ends up taking so long. On the surface, it may seem like modern hard drives don’t have bad sectors (unless they are going bad), but in reality they do. The manufacturers set aside space to re-map bad sectors to so that from Windows perspective, the drive has no bad sectors. So the regular format makes that initial sweep of a new drive to discover any bad sectors before you put it to use. Quick format is better suited for a drive that was fully formatted previously.
Using the Flex Bay in a Dell Precision T5500
by Jitesh Gandhi on Feb.06, 2010, under Computer Hardware, Technology
I wanted to add a hard drive to my PC for additional storage of media. I plan to mirror my primary drive and I don’t want to clutter it up with media. I want to use it only for applications and work. The Dell Precision T5500 in a mini-tower configuration has what Dell calls a flex bay. You can have an internal drive or an external drive in that bay.
I’ve had good luck with Dell service manuals in the past, but the one for the T5500 is of no real help when it comes to the drive bays, especially the flex bay. It took a little bit of figuring out, but I managed to get the hard drive installed, so I thought it might help others to explain how I did it.
Dell has good instructions in their service manual for the T5500 for some of the steps. I will also make use of some of their pictures as well. So here we go.
- Follow the service manual for removing the Cover (pulling the panel completely away makes it easy to lift out).
- Follow the service manual for removing the Front Bezel (this requires force and it helps to have someone hold the switch so you can hold the case and slide the bezel).
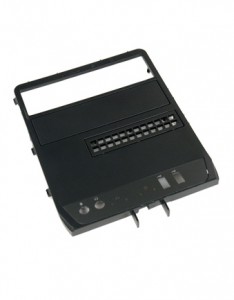
- Follow the service manual for removing the Drives Bezel.
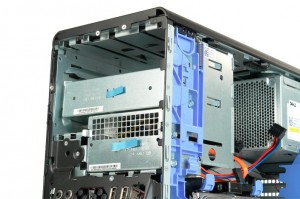
- My machine had only one optical drive, so there were metal covers over the second optical bay (5.25″) and the flex bay (3.5″). Pull on the “tab” (it’s the blue sticker attached to the metal covers in the picture above) to remove the metal cover. It’s in there pretty tight. My “tab” was not placed correctly and broke. If that happens, you can remove the one above it in the optical bay and then pull out the flex bay cover by getting your hand behind it. Worst case, both “tabs” break and you can remove the optical drive and then remove the two covers by hand. They all are set into grooves that act as rails for the screws.
- On the back of the drives bezel there are screws that you need to use on the hard drive. Remove the four at the bottom around the flex bay grill. Screw those into the the forward most holes on your hard drive (2 on each side) leaving the rear ones (closest to the power/data connectors) empty.
- Slide the hard drive into the flex bay grooves while holding down the sliding plate that locks the drives in place. If everything is done right, the hard drive will be locked into place and you can connect the power/data cables (it is helpful to disconnect the power cable from the optical drive to make it easier to connect the power cable to the hard drive, just be sure to reconnect the power cable to the optical drive). I bought a 0.4m (~16″) SATA cable which was way longer than needed. A 6″ cable would be long enough.
- Slide the metal cover(s) back into place to cover up the bay(s).
- Follow the service manual for replacing the Drives Bezel (the left side needs to be put in place first and the right side near the USB ports will not snap into anything, the front bezel will hold it down).
- Follow the service manual for replacing the Front Bezel (make sure everything is aligned and in their grooves before sliding it in place, if you don’t, remember that there is a release switch to remove it).
- Follow the service manual for replacing the Cover.
- Hook your PC back up and when you turn it on, hit F2 to enter setup and make sure that the SATA port that you connected the drive to is enabled.


 Facebook
 LinkedIn